Introduction
At ENPICOM we want to provide the best possible experience for our customers while also managing our operating expenses. A large part of those expenses come from our intensive cloud usage. We depend on Amazon Web Services (AWS) cloud for hosting our IGX Platform and for supporting our research initiatives.
Those familiar with cloud services know that the process of provisioning new compute resources is completely different from what it used to be. Back when a cloud was still something that belonged in the sky, resource provisioning took time and planning. Costs were (mostly) known up-front, and everything needed to be meticulously planned so there would be no compute or storage shortages.
Today, any resource that you can think of can be provisioned on-demand, within minutes. There is no need anymore to account for future needs. Why would you, when every shortage can be resolved as it occurs with auto-scaling functionality built directly into the cloud?
Of course there is always a catch. The cloud, while it is an incredible innovation, does cause some issues from a financial management viewpoint. How do you manage costs, when it is not accounting or management that controls computing expenditures, but developers themselves?
We noticed soon enough that if we left our cloud costs unmanaged, they tended to increase rather quickly over time. We went from negligible daily expenses, to monthly bills that were definitely not insignificant. It was clear that we needed to address this issue soon, before it got out of hand.
To tackle this issue we implemented a three-pronged approach at ENPICOM: identify cost sources, control new expenses, and reduce existing expenses.
First of all we needed to identify existing cost sources, so we knew where our expenses were coming from. we needed a detailed reporting and cost tracking system so we knew where the costs originated.
This gave us a good starting point for the next part of the approach: controlling new expenses. All new expenses logically come from from developers with cloud access creating resources. To avoid unwanted or unexpected expenses, we would have to implement some type of review process, or limit developer permissions within AWS.
We couldn’t work while the ground was shifting under our feet. The expense level needed to be maintained as much as possible before we did anything else. Once that was done we could start with actually reducing existing expenses. This turned out to be relatively easy, having completed all the previous parts of our approach. The fact that we hadn’t implemented any cost-savings measures before helped as well, admittedly.
Identifying cost sources
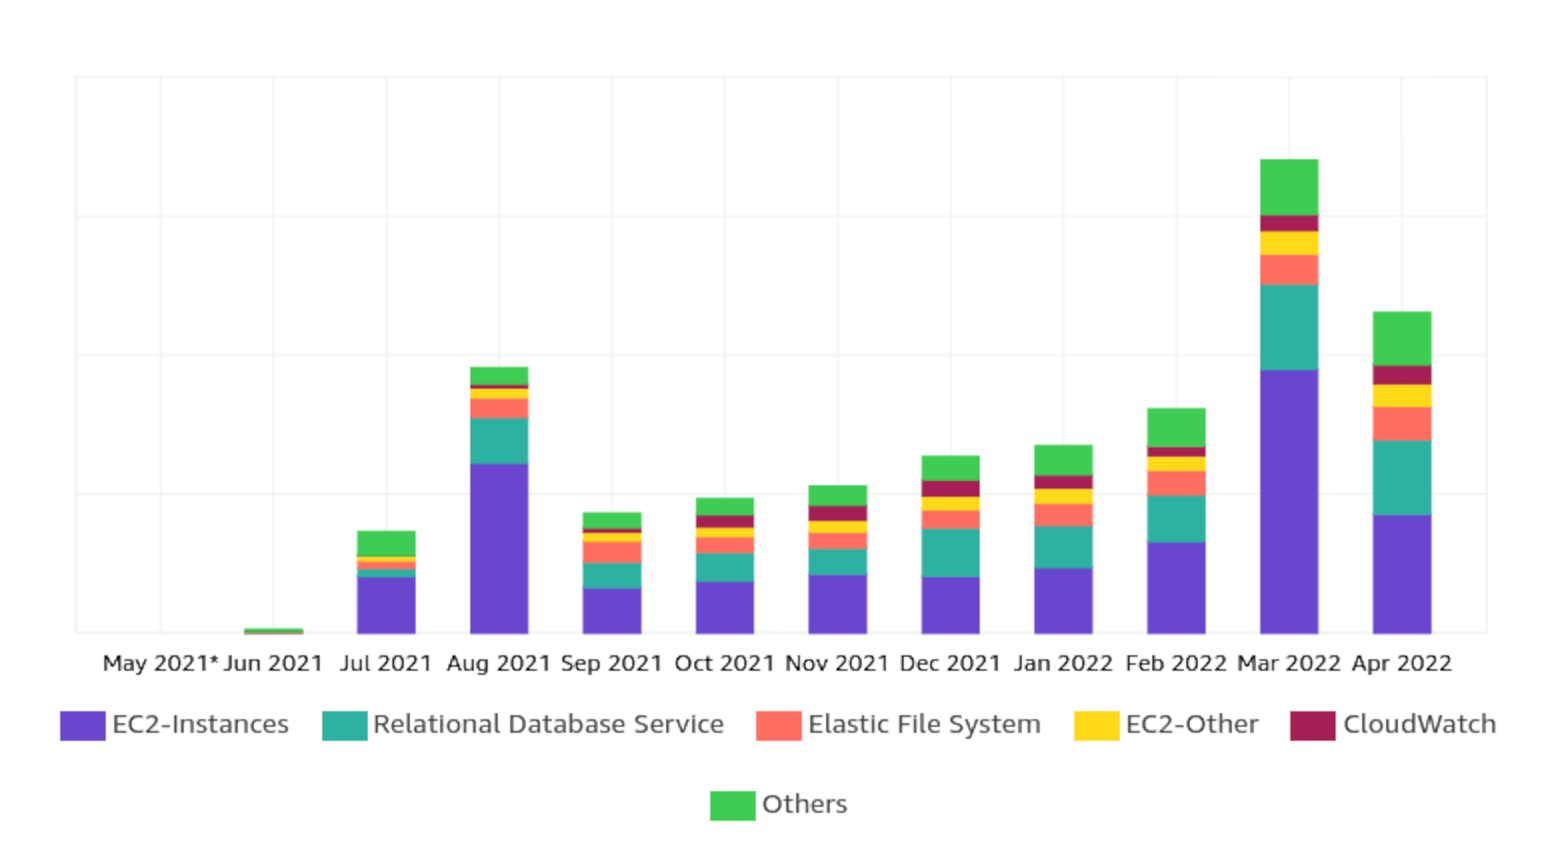
To identify cost sources we made prolific use of AWS Cost explorer. We required a good overview of what we were already spending, including the specific services that we spent the money on. The cost explorer charts made this very easy with the built-in grouping and filtering functionality.
In addition to the built-in cost explorer grouping, we also needed to be able to divide the costs into groupings of our own choosing. The cost explorer is by default able to group expenses based on any AWS-specific attributes, such as service, region or account. We wanted to group based on attributes specific to our company as well, such as team or project.
We were able to find built-in functionality for this as well, in the form of AWS cost allocation tags. By default AWS doesn’t track which expenses belong to which tag. To do that, we need to explicitly define the tags we want to be tracked. Once defined, you can use the cost allocation tags inside AWS cost explorer to group and filter costs in the graphs.
Of course, that still leaves the question of which tags to use exactly. Choose too little tags, and you will not be able to track the details you want. Choose too many tags, and resource tagging becomes difficult to enforce. There is a certain trade-off to be made, and the optimal tagging strategy will be different in every situation.
Introducing a tagging policy
We went with a tagging policy that has 2 required tags and two optional tags (required only in certain situations):
- Team tag: Indicates the internal team that is responsible for the cloud resource. It allows us to divide the cloud spend between the different teams working on AWS.
- Project tag: Contains the name of the project to which the resource belongs. It is very useful for us to divide cloud spend between projects, seeing as we have several external (i.e. customer-facing) and internal projects, and a limited budget for each of these projects.
- Environment tag: For the customer-facing projects (such as our platform), we have several environments (develop, staging, production). To keep these costs somewhat separate, we need to tag each resource with the environment that it belongs to.
- Cost centre tag: The cost centre to which the resource belongs. The primary purpose of this tag is to provide further insight into the cloud spend of one particular project. For example, in the IGX Platform project we have two cost centres: the platform itself, and the compute jobs run by customers. Using this tag enables us to distinguish our operational costs between the two.
Enforcing our tagging policy
When we started using the tag policy we were still manually provisioning AWS resources. This made the cost tracking rather error-prone. Sometimes people would forget to tag a resource, other times the tags had typos, all of which resulted in inaccurate graphs.
Once we started using AWS Cloud Development Kit (CDK) to provision our resources using a “Infrastructure as Code” methodology, most of those issues went away. CDK allowed us to specify the tags in one place, and tags could be inherited by child CDK resources as well. CDK gave us an ad-hoc way of “enforcing” our policy, through the code. Any changes to the tags would have to go through code review, where we could ensure that any new CDK-provisioned resources were tagged correctly according to the tagging policy.
In addition to utilizing CDK we also used the tag policy functionality of AWS Organizations in combination with Service Control Policies to fully enforce the tagging policy (i.e. enforced through AWS instead of company policies). The implementation of this was quite complicated, but we will leave that topic aside in this article.
Controlling new expenses
To control new expenses we had to tackle two issues. We required a good reporting system that allowed us to stay up to date on the current state of the costs and gave us the capability to intervene quickly when needed. We also needed a way of limiting who could create new resources, so that there was a “gate“ where we could have an overview of what was being created and so that we could implement policies and rules.
Cost reporting
For the reporting system we didn’t have to look very far. AWS already has a cost reporting service built in: AWS Cost Explorer. Cost explorer allowed us to graph our expenses and determine what our greatest cost drivers were. The most valuable thing about cost explorer is that it has integration with the tags on AWS resources. This meant that we could view the expenses grouped by attributes that were relevant to us, such as team, project or environment. You do have to enable this functionality, because by default AWS only tracks “cost allocation tags“, which you have to manually enable in the AWS billing console (as mentioned earlier).
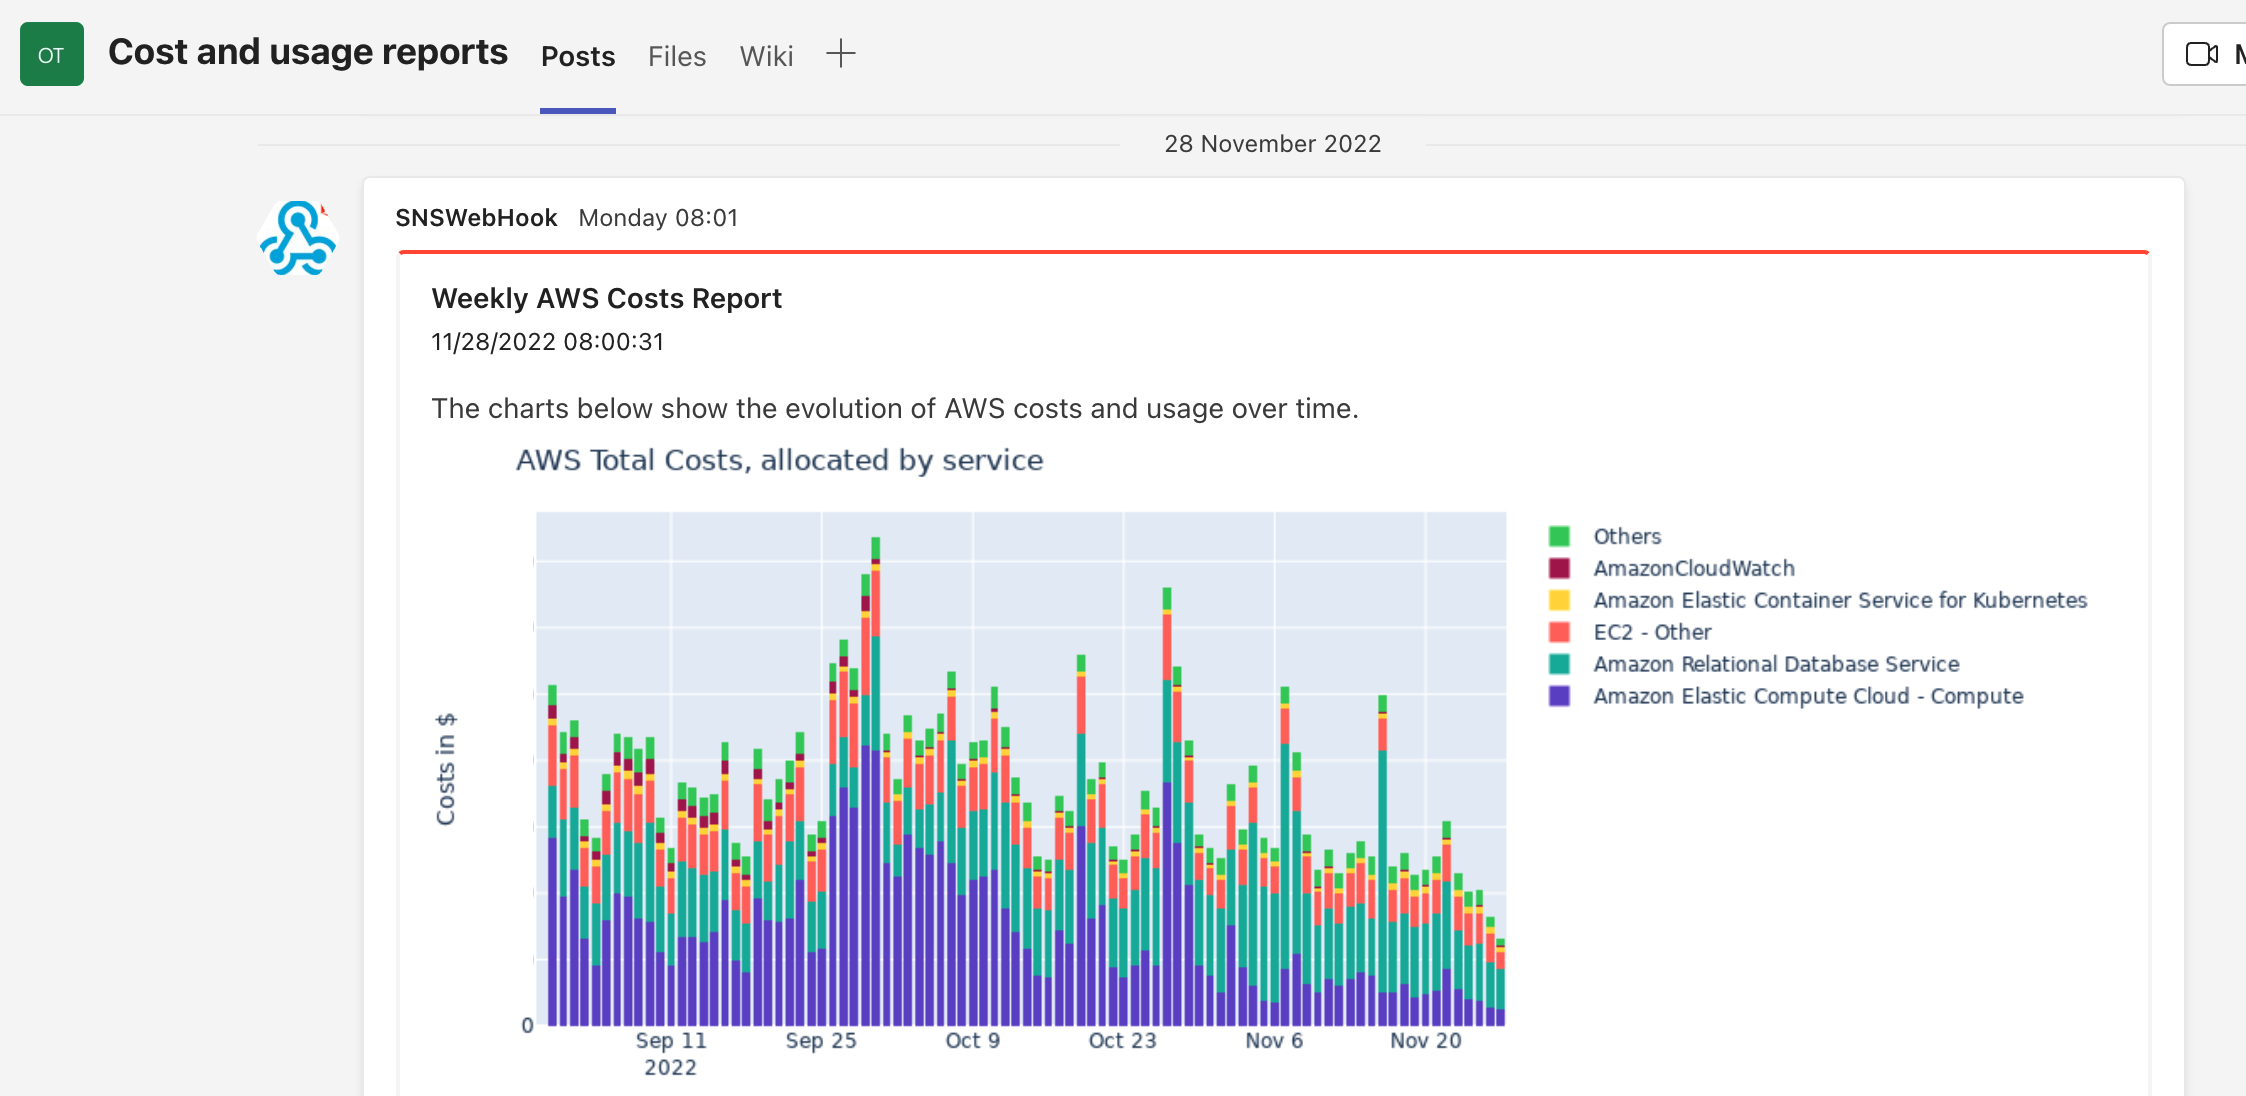
The only thing we were still missing was a good way of periodically sharing the information contained within cost explorer. Remarkably there is no direct way of getting the cost explorer graphs using the AWS Cost Explorer API. If you want the graphs outside of the AWS console, you need to grab the underlying graph data using the AWS API and then render the graphs yourself. This is exactly what we did. We created an AWS Lambda that ran every monday using EventBridge scheduled rules. The lambda grabs the graph data from AWS, builds the graphs we want, and then posts them to the DevOps teams channel. The result looks like this:
In addition to this custom reporting system we also set up some spending limits using AWS budgets. The reporting system gives us a good overview of the long-term trends, but that still leaves the possibility of sudden increases in spending which we need to be notified of immediately. The AWS budget limits fix that issue. If a budget limit is reached an email is sent to a monitored email account and we can take immediate action.
Introducing new processes
To limit the creation of new resources we introduced a whole new process into our workflow. Before this all new resources were mostly created by hand. This caused some issues, because there was no oversight on what new resources were created, why they were there, and who created them. In the optimal situation every change in the cloud would go through the devops team, but since access to the cloud was spread across the whole software team, this was not always the case. However, at that point in time we did not have a good way of resolving these issues.
In the meantime, while we were working out our cost reduction plan, we were also finishing our Infrastructure as Code (IaC) project. Infrastructure as code, as you may know, is the practice of defining and deploying your infrastructure in code. Popular examples of this are TerraForm and CDK. With our IaC project we aimed to get all our AWS resources managed with CDK code.
Once this project was completed we had the means to enforce a new cost management process. All new infrastructure changes on AWS had to go through CDK before being deployed, meaning a pull request had to be submitted. We then introduced a policy that each CDK code change had to be reviewed by two members of the DevOps team.
This way we always knew what new resources were being created and why they were being created. We also had a point in the process now where we could give feedback. This was definitely important in context of our cost savings, as there is often a cheaper alternative than the “obvious“ solution one thinks of at the start.
Applying cost reductions
Once we had a good view of where our expenses were coming from, we could start looking at applying cost reductions. The control measures we took earlier made sure that there would be no significant changes in our expenses, so we did not have to worry about playing whack-a-mole with new costs popping up everywhere.
Pausing unused resources
Remarkably, the thing that saved us the most money was simply pausing resources when they were not being used. At ENPICOM we run three environments for our IGX platform, one for testing, one for staging/acceptance and one for production. While production was obviously being used 24/7, the develop and staging environments were only being used during work hours. Simply by turning off these environments in the evening and during the weekend we saved around 25% of our yearly expenses. Turning off an environment here means shutting down the associated EC2 instances and pausing the environment database. You will stay pay for all the storage that is being used, but the compute costs are temporarily gone.
It is a simple idea, but it does require some thinking through to properly implement it. There are several details that make it a bit more difficult to implement than one would think. For example, you can only pause an RDS database for 7 days. After that, AWS will automatically start up your database again. So a good implementation requires logic to handle this.
Another detail is that not all EC2 instances can be shut down just like that. Our platform is built on the managed AWS Kubernetes Service (EKS). This means that our EC2 instances are managed by autoscaling groups connected to EKS nodegroups. If you stop an EC2 instance, the nodegroup will just recreate it. To stop these instances, we need to set the desired number of instances on the nodegroup to zero, and afterwards run some logic that kills any pods that take a long time to be killed.
In addition to these two things you also have to be able to handle all the possible states of the database in your pausing/resuming code. This is quite important, because if you pause an RDS database that is already paused, is in the progress of being paused, or is being resumed, the operation will fail. If the database is being paused, and you run the environment pausing code, it obviously should not fail, but you need to handle that yourself.
And that’s only the technical details on how to handle AWS specific issues. You still have usability issues to worry about. We quickly found out that some people do need access to the develop or staging environments outside of working hours. There were also situations where one of these environments needed to be available for a longer amount of time, e.g. a full week. This required a lot more logic to be implemented in what was otherwise a rather simple cronjob script.
We ended up implementing it using a github actions workflow. The workflow runs the pausing/resuming command in a docker container containing the relevant code. During the week it resumes all the resources every morning, and it pauses them every night. The useful thing about it being a Github Actions workflow is that the workflow can be manually run from the github repository page by developers. This allowed developers to use environments at night or during the weekend. It even gave us the ability to temporarily disable the automated pausing or resuming of an environment.

Aurora serverless
One thing we tried to reduce our costs was to move our RDS databases to Aurora Serverless V2. In theory, it was a perfect opportunity to save about 15% of our yearly costs. Aurora serverless could scale up database performance when needed, and scale back down immediately afterwards. This fit our workload quite well.
The reality turned out a bit different. We ended up deploying Aurora Serverless on staging before we found out that it was simply not tailored to our needs. The main issue we noticed was that it simply did not scale up fast enough. If there was a period of low usage, and then suddenly a heavy query would run on on the serverless database, it would take dozens of seconds for the database to scale up to a level that could handle the query in the required amount of time.
The thing is that Aurora Serverless can definitely scale fast. However, that is only the case if the database has already been scaled up. The larger the database capacity at a certain point in time, the faster it will scale up or down (according our experiences and confirmed by the AWS docs). The solution seems obvious then: increase the minimum serverless capacity, so that it can scale up faster.
That didn’t work because of the higher costs for Aurora Serverless. Compared to a normal RDS database, a serverless database is a lot more expensive for the same amount of capacity. We assumed that it would be less expensive in the long run because of the automatic scaling, but that turned out different than expected.
Overall Aurora Serverless is definitely still a good product, and we actually do use it for a number of our smaller services with irregular workloads. But in this specific scenario it just did not work out.
Moving from EFS to S3
File storage was a large part of our expenses before the cost reduction project. We started out using AWS Elastic File Storage (EFS) to store our files. Originally we also used a network file system on GCP, so during the migration we just sought to replace it with the most similar service – which turned out to be EFS.
EFS is a great service for what it does, but it does demand quite a large surcharge over a simpler file storage service like AWS S3 (presumably for all the extra features that it provides). It is very easy to integrate into a system that works directly with files. An EFS volume can simply be mounted to one or more EC2 instances, making the files accessible through the instance filesystem without any kind of setup.
When we first migrated to AWS we had a relatively small amount of files. Because of this it made sense to go for EFS at first – the costs were still low, and it was very easy to integrate into our platform. Once the storage increased to more than several terabytes, the costs did become an issue.
We ended up quickly replacing EFS with S3, reducing our file storage costs to practically zero. The integration into the platform did require some more work than it had been previously. It is possible to mount an S3 bucket to the filesystem, but because the read and write performance characteristics of S3 are completely different than a normal filesystem it does not make sense to use it like one. Instead we opted for an integration that simply downloaded and uploaded files from and to S3 as required by our system.
In total we saved about 10% just by migrating our file storage to S3.
Reserved instances and savings plans
Reserved instances and savings plans allowed us to save between 10 and 30% on our compute costs, almost risk-free. We had – and still have – a pretty good view of how our platform architecture will look like in a year, including our compute usage. This gave us the freedom to buy reserved instances and savings plans for up to a year in advance.
We opted to use reserved instances for the always-running database instances, as that was the only option for saving on our database costs. For the EC2 instances we chose to go with an EC2 instance savings plan covering the minimum level of EC2 usage over the last year.
Rightsizing instances
Another “obvious“ thing we did that saved a lot of money was simply right-sizing our instances to the workload. We noticed that over time there was a trend for instance size to grow – usually because we temporarily had to increase the instance size to accommodate a higher workload, and then forgot to reduce it again. There was also a tendency to overestimate what amount of compute power and memory we actually needed. Once we had collected some metrics we were able to correctly estimate the instance sizes, while maintaining the desired high performance of our platform.
Moving to ARM instances
Recently AWS has made a big push for customers to use ARM instances, such as the AWS Graviton instance family. These are about 10% cheaper than x86 instances in our experience. The downside is that you do need to refactor your docker images for the ARM architecture, which required some custom tooling to handle in our case. We still develop locally, and our developers use both ARM and x86. So we needed to be able to build for both architectures in order to maintain our development workflow. Once we implemented this, moving over to ARM instances was a foregone decision.
Removing unused docker image from ECR
When we originally migrated from GCP to AWS we also moved our image registry to AWS Elastic Container Registry (ECR). At the start, it basically cost us nothing. However, over the course of several months we noticed that the costs increased daily. We did some investigating and quickly found out that the costs mainly consisted of docker image storage. The registry was saving all the old docker images, even ones that we had not used for over a year. The main issue was that we did not apply lifecycle policies to our image repositories. Our CI/CD runs on every commit pushed to github, so over the long run that resulted in a lot of images stored on ECR.
There were a lot of quick potential savings here, about 5% of our yearly spend, attributable only to those old stored images. But, as is often the case, applying those savings was a bit more complex than just removing old images. Lifecycle policies can be used to remove old images based on a prefix that is part of the image tag. But to use this feature you do need to use appropriate prefixes in your image tags, which we were not doing.
In our case we had four types of images:
- Throw-away images: Built by the CI/CD on every push to github. These were only needed during the CI/CD run, but afterwards they were pretty useless.
- Develop images: Built specifically for the develop environment. Usually the develop environment gets deployed daily, so we only need to keep these images for like a week.
- Staging images: Same situation as the develop images, except that the staging environment only gets deployed to every few weeks. So to keep staging running we need these images for at least a few months.
- Production images: Built for every production version. These images need to be kept forever, for archiving purposes.
We did not have a proper image tagging policy at the start of our AWS migration. To be able to use the lifecycle policies we created one, so that each image type had a corresponding tag prefix. Before we applied the lifecycle policy we re-tagged all old images according to our new policy.
From that point on we could apply our lifecycle policy to remove all old images. We kept all the prefixed images as long as required, and removed all images that did not have a an appropriate tag.
Removing zombie resources
Because we didn’t have any overview of what resources were being created within AWS at first, we had some resources that were “forgotten” about. These were mostly EC2 instances, EIP addresses and similar resources, spread across AWS regions. Individually they didn’t cost enough to be noticeable, but together they did cost us around $1000 yearly. Deleting these resources was an easy and quick win.
Conclusion
During this project we had a lot of fun finding out interesting new ways of reducing our AWS costs. All together we managed to reduce our costs by about 50%, thanks to the many cost savings measures we implemented. Not only that, but we also professionalized our cloud cost management by introducing a cost monitoring system, as well as a process for keeping new costs under control. We managed to reach our cost objective, without compromising on quality.
Not every cost reduction measure that we took worked as expected. Migrating to Aurora Serverless was supposed to be one of the biggest cost savers, but as it turned out the product was not applicable to our situation. A lot of the cost reduction measures were also surprisingly obvious once we started looking, such as applying lifecycle policies to ECR and pausing unused resources. Other cost reductions were entirely the result of just choosing the right AWS product, like using S3 instead of the much more expensive EFS.
If this article has piqued your interest, you might be happy to know we are always looking for capable software engineers at ENPICOM. Be sure to check our careers page for any available positions!
 | Jelle PelgrimsSolutions EngineerAs a Solutions Engineer at ENPICOM, Jelle is part of the DevOps team and responsible for the cloud infrastructure. Jelle focuses on keeping the cloud expenses under control, in addition to working on the monitoring system and the CI/CD. |