Introduction
The login experience is the first impression our customers have of the IGX Platform. A new user browses to igx.bio, enters their credentials and logs in to the platform. This series of actions is seemingly simple, but there is a lot that is going on behind the screen to make everything work out just right. As it is the first point of contact for our new users, we want the experience to be streamlined and without issues.
In this article we will give a clear overview of how we designed and built our login experience, and how we made it as robust as possible. We will go over our initial design, how we migrated this design into Auth0, and finally how we made custom SSO solutions for some of our customers. The article concludes with some of our personal findings and opinions.
So what is identity access management anyway?
Before we go into details, it might be a good idea to briefly explain some of the topics we will be discussing in this article.
Many of the topics here fall under the field of Identity and Access Management (IAM), which is a good place to start. IAM is a bit of an umbrella term, covering everything that has to do with managing authentication and authorization. These two terms often get confused, but the difference is quite simple: authentication has to do with identifying a user, i.e. knowing who you are dealing with. Authorization is what happens after the authentication, after you already know which user you are dealing with. At this point you need to verify and control what the user can and cannot do, which is what we mean when we use the term “authorization“.
A big part of IAM is the topic of Single Sign-on, or SSO. The basic idea behind SSO is that you should be able to access one system with user accounts from another system. Think of how you can log in to a lot of websites with just your GitHub account – this is possible because all those websites have implemented an SSO solution.
An SSO implementation requires an identity provider (IdP). This is just a system that stores user accounts and provides tokens to log in to external websites with these accounts. An identity provider by itself does not make a working SSO solution. For this you need your own system to accept the accounts from the IdP. This is achieved by using tokens.
It works like this: a user wants to log in to your system. You redirect them to the login portal of the external identity provider. If the user enters correct credentials, then the user will be redirected by the identity provider to the original system along with a token. This token contains the identity information of the user account. Now your own system knows the user has successfully logged in, and the whole SSO process is complete.
This example workflow is of course a very simplified view of how SSO works in real life. You still need to set up a trust relationship between your system and the identity provider, and you need to figure out how to integrate the external users into your system.
A blast from the past
Originally the whole authentication process was being handled by ourselves, within the IGX Platform. We managed the login page, cookie handling process, user storage and credential management. All this functionality was put into a Node.js service within our services-based system. This service worked together with the Ambassador ingress controller to authenticate all incoming requests. The mechanism behind this is called external authentication. It works like this:
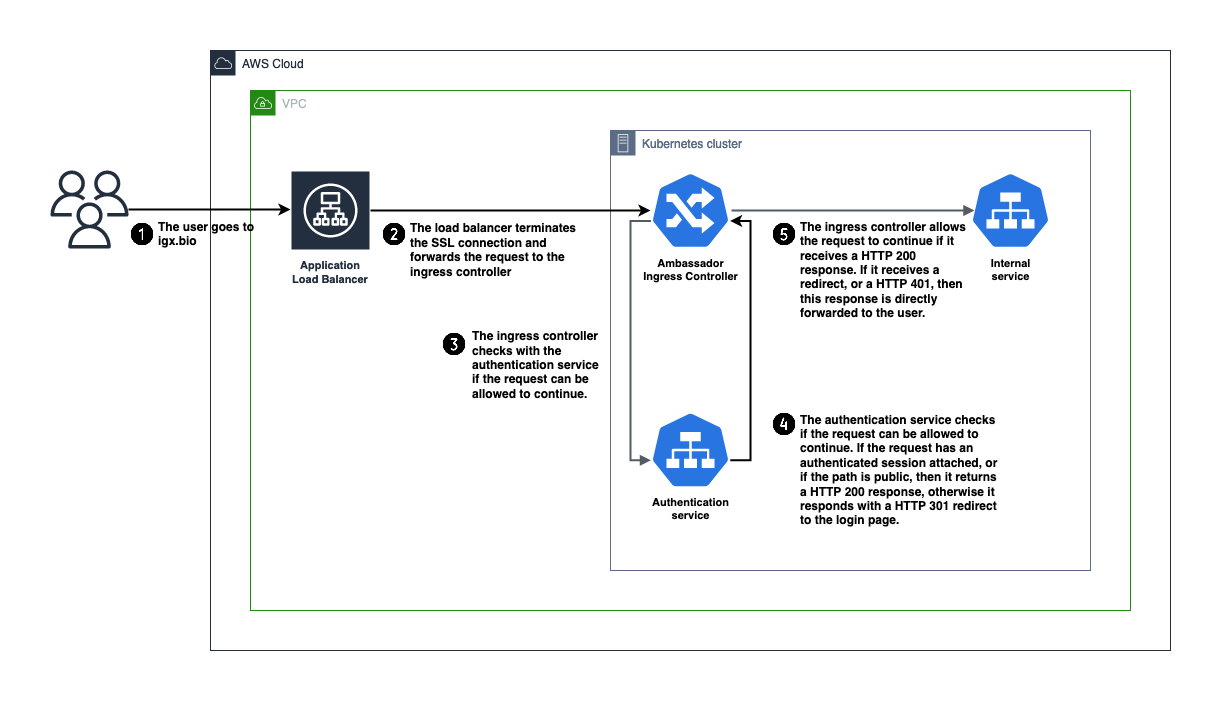
- A user sends a request over HTTPS to the load balancer. Either the user is trying to log in to the IGX Platform, or the user is already logged in and the web application is making request due to user actions.
- The load balancer terminates the SSL connection and forwards the request to the Ambassador ingress controller.
- The ingress controller is configured to check with our external authentication service if the request can be allowed to continue. The request (mostly just the relevant headers) is forwarded to the authentication service.
- The authentication service looks if the request can be allowed to continue. In some cases the request can just be allowed through without further checking, for example if the user is requesting the login page or static UI assets. If that is not the case, then we start checking if the user has already been authenticated. We do this by looking if there is a session cookie set for the user. If so, we verify that this specific user can access the requested route, and allow the request to continue. If none of these cases apply to the request, we stop it from going any further.To indicate that the request can continue the authentication service will return an HTTP 200 OK response to the ingress controller. If the request was denied then an HTTP 401 or HTTP 403 will be returned. It is also possible to return an HTTP 301 redirect. In that case the ingress controller will redirect the user to an URL that we choose. This is useful to redirect unauthenticated requests to the login page, for example.
- The ingress controller decides based upon the response of the authentication service whether the response can be allowed through. The decision process is rather simple, anything other than an HTTP 200 OK response results in the request not being forwarded into the cluster. The ingress controller then simply returns the HTTP 301, 401 or 403 response from the authentication service back to the user that made the original request.In any other case the request will be allowed through to the internal services responsible for handling the request within our Kubernetes cluster.
The rest of the authentication service worked in a pretty standard way. A user could authenticate themselves by going to the publicly available login page. The authentication service would then create a session cookie, valid for a certain amount of time, if the user credentials could be validated against the hashed credentials stored in the database.
Going for Auth0
At a certain point it became clear to us that we would soon need to implement a lot of authentication features, such as SSO and Multi-Factor Authentication (MFA). We knew that we didn’t have the required in-house knowledge and experience to build these features from scratch. User login also was not part of our core business. Putting in lots of time on this particular aspect of the platform would be detrimental to other, more valuable development efforts.
The outlook was clear: we would need to outsource these features. We had a look at the available options and immediately one company jumped out at us: Auth0. This Software as a Service company (SaaS) provides an authentication service complete with APIs and lots of extra functionality (such as SSO and MFA). Compared to the alternatives they had a lot more and better documentation. It was also very easy to start a trial with them. We didn’t have to go through any sales meetings before getting access, instead we could just directly try it out and see if their services fit our needs.
With the trial and documentation we had enough information to verify that their product had all the features that we required. We went ahead with the integration of Auth0 into our authentication process.
Looking for (integration) trouble
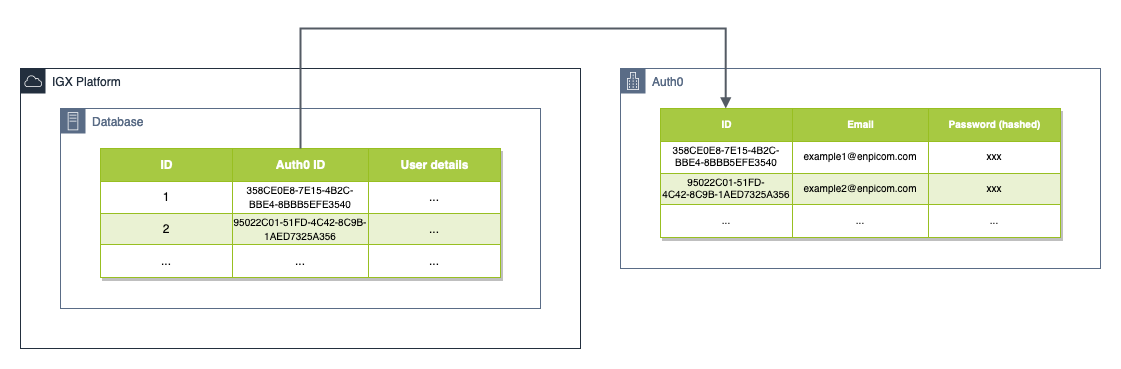
Only specific parts of our authentication process were moved into Auth0. The login page was migrated to the Auth0 login portal, and we also let Auth0 take care of credentials. However, we did not fully move over our user storage to Auth0. We still wanted to use our database as a single source of truth. This was mainly because the user database object was already quite entangled with other database objects. Moving the user data outside of the database would have required a major rework of a large number of SQL queries. Instead we thought of a more pragmatic and elegant alternative.
We decided to create an Auth0 account for each account that we had stored inside the database. This Auth0 user would not store any user details, but it would be used for storing credentials. The Auth0 account and the database account were linked to each other by an extra unique column in the user table in our database, which stored the Auth0 user identifier. With this we could keep all user details inside our database, so it remained the single of source of truth, and we did not have to worry about credential management anymore (as it was outsourced to Auth0).
There are some downsides to this approach: if you want to create or delete a user, you need to talk to two systems instead of just one. During these operations it is very possible that Auth0 and our database become out of sync, so that there are Auth0 users for which there exist no linked users in our database. This situation is obviously problematic as a user can still log in, but then won’t be able to actually access the platform (because the authentication service will return an error since it can’t find a user in our database linked to the Auth0 user).
In the end, the advantages still outweighed the downsides. We resolved the bad scenarios by properly executing user operations inside atomic transactions, so that a failing user operation would not result in a bad state.
Taking the authentication service to the next level
After our integration with Auth0 the authentication process looks quite similar as it did before. We still use the “External authentication“ feature of Ambassador to authenticate incoming requests. The major difference is that the authentication service now talks directly to Auth0 to authenticate a new user, while we are performing the authentication flow. The logic that decides whether a user’s credentials are correct is now completely handled externally. All the other logic remains within the authentication service.
Integrating with Auth0 did require adding some extra code inside the authentication service. However, due to the way we had built the service this barely required any refactoring work. The extra code was needed to call out to Auth0 to verify a user’s credentials and their identity. It sends all unauthenticated user to the Auth0 login page. The user enters their credentials there, and Auth0 authenticates the user. If everything checks out, then Auth0 informs our authentication service of the user’s identity. We take over from there.
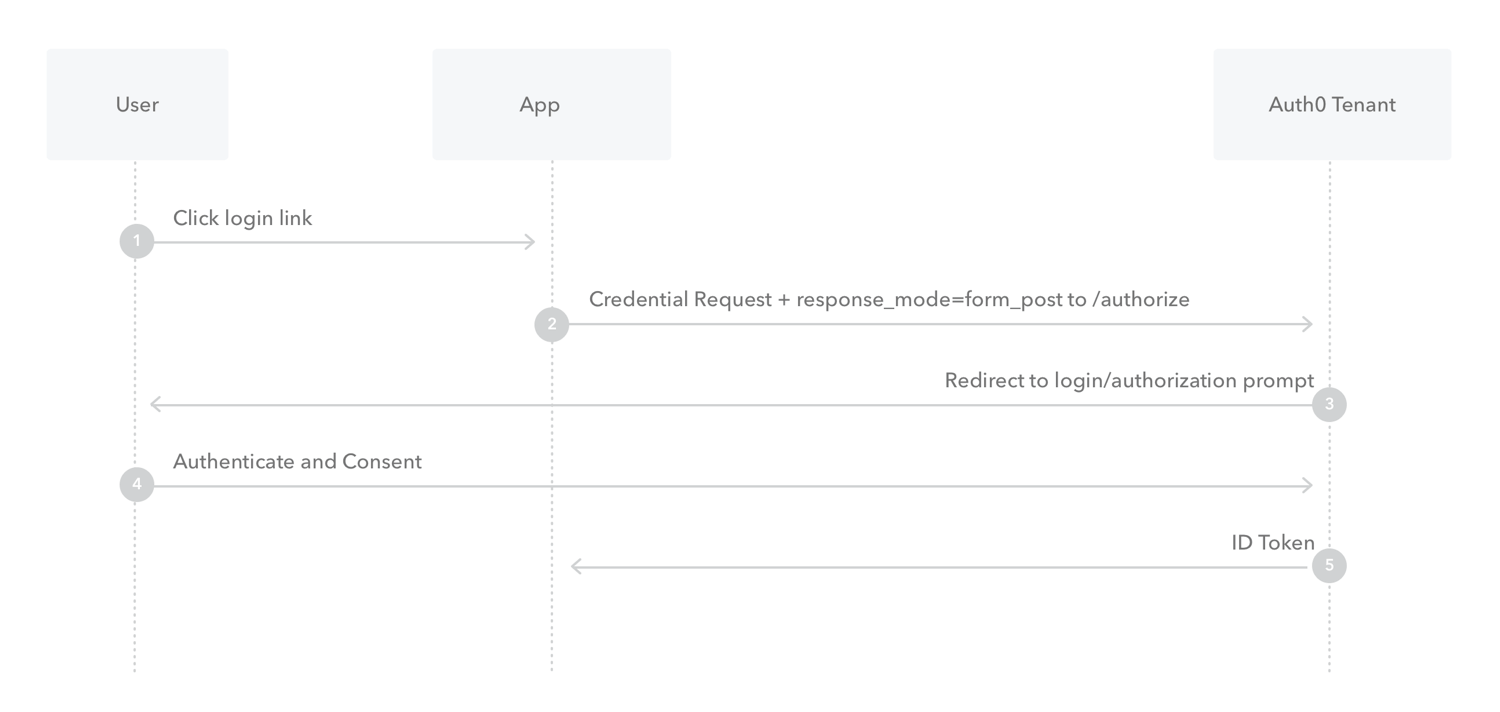
The implementation of this authentication flow is called “Implicit Flow with Form Post”. This flow is perfect for web apps where you only need to log in a user once. It is also very simple to implement. The basic implementation only required two extra endpoints on our authentication service: one for redirecting unauthenticated users to Auth0, and one to receive the authentication result from Auth0.
It works like this:
- The unauthenticated user goes to igx.bio.
- The request ends up at the authentication service. It redirects the request to the Auth0 authentication url.
- Auth0 receives the user request, and redirects the user to the login page for our Auth0 tenant.
- Auth0 verifies the user’s credentials.
- The result is returned by Auth0 to a callback endpoint on the authentication service. If the credentials check out, then this result will contain the user details inside of a token.
- At this point we search the database for which user authenticated exactly, using the Auth0 identifier. If we find the user, we create a session for them.
Adding the cherry on top: Single Sign-On
Soon after finishing the Auth0 integration we got a customer that requested to make use of Single Sign-On to log in to our platform. We already explained SSO earlier in the article, but what it came down to is that they already had an identity provider with accounts, and wanted to use those accounts to log in to our platform.
Since we were now outsourcing our authentication logic to Auth0, one would assume that we could just enable SSO integration with the customer by clicking around in the Auth0 dashboard. It didn’t really turn out that way for us because of the way we had set up our system: every Auth0 account required a linked database account. The external identity provider of the customer connected just fine with Auth0, but we didn’t have any functionality in place yet that automatically created a user inside our database when a SSO user logged in.
Now it would seem that this problem is easily solved by just creating a new account in the database if an unknown SSO user from Auth0 logged in. That is indeed the case, but of course there are several catches:
- First of all, what do we do if we end up with duplicate accounts? There should only be one account with a specific username or email, so how do we reconcile this situation if it occurs?
- How do we know in which organization to place a new SSO user? Because our customers are usually larger companies with multiple individual users, we have built the “organization“ concept into our platform. All the accounts from one customer get placed in the same organization. However, the ID token we receive from Auth0 does not contain information about which identity provider it comes from, so we had to figure it out somehow.
- If we have a new SSO user, and we know which identity provider it came from, how do we stop them from accessing the platform? This is important because it might be the case that not all accounts from the identity provider should have access.
Duplicate accounts
The first issue we resolved by simply merging an existing Auth0 account with a new Auth0 account, if they both had the same e-mail address specified. This situation might seem unlikely, but it actually occurred quite often for us. Our application scientists, who help our customers with getting started on the IGX Platform, usually set up accounts for users before they log in for the first time (or perhaps even before we have set up the IdP connection in Auth0).
When they create a new account, both an Auth0 account and a linked database account get created, with the customer’s email address. After we have set up the IdP connection with Auth0, and the client logs in for the first time, Auth0 will internally create a new account with the same email address. This doesn’t cause any issues in Auth0, because while the two accounts have the same email address, they come from different sources (Auth0 accounts are attached to a “connection”, which just indicates where the account came from). It does however cause issues when the user logs in using SSO. Because the new SSO user does not have a linked database account, our system will create a new account, which is not set up yet by our application scientists.
Instead what we want to happen is that the user logs in directly to the account that our application scientists have already set up. Doing this was quite easy, as Auth0 has built-in functionality to merge two Auth0 accounts. More specifically, every time an SSO user logged in, we checked if there already was a configured account with the same e-mail address available. If that was the case, then we merged the two accounts. After that the user would always log in to their previously set up account.
Placing a new user in the correct organization
As mentioned before it is quite hard to find out which external identity provider an Auth0 account came from. There is no obvious API call to get this information from either. But we do need to retrieve this information somehow, otherwise we do not know in which organization to place the account.
One thing we can see in the ID token we receive from Auth0 is the email address of the user. This piece of information is a perfect way to identify which identity provider we are dealing with. Also, each organization has one or more domain names attached to it. The process of figuring out which organization a user belongs in then becomes a simple matter of performing a lookup on the domain name and finding the related organization.
Conditional platform access
Stopping unapproved users from accessing the platform was actually quite easy to figure out. By default we “disabled” every new SSO account that logged in. This meant that the user could log in, but he/she would only be redirected to a welcome page telling the user to contact customer support. Only accounts that were properly set up would be enabled and could access the full platform experience.
Jumping to conclusions
We went through quite a bit of theory. We started out at the beginning, when we had just a simple authentication service. We then moved on towards Auth0, which enabled us to provide a better and more capable login experience to our customers. The integration of Auth0 into our platform had some more difficult aspects, which we described in detail. Finally we wrote about our implementation of Single Sign-On, making it even easier for our customers to use our platform.
With this article we wanted to shine some light on all the different aspects of implementing a good login experience. Authentication is something that is ubiquitous in the software world. The logic behind it can be simple, but is often necessarily complicated due to all the features that need to be supported. We hope that with this article we have made a complex topic a bit more manageable.
Hungry for more? Our authentication adventure is far from finished. At ENPICOM we are always looking for capable engineers that can help us move forward. Apply through our careers page, and perhaps you will soon write the next chapter in our authentication story!
 | Jelle PelgrimsSolutions EngineerAs a Solutions Engineer at ENPICOM, Jelle is part of the DevOps team and is responsible for the cloud infrastructure. Jelle focuses on keeping the cloud expenses under control, in addition to working on the monitoring system and the CI/CD. |